|
Getting your Trinity Audio player ready...
|
In our previous article (Google Sheets Introduction), we discussed what Google Sheets is, its history, and how to open and create your first file.
👉 In this article, we’ll focus only on the Google Sheets Basics: formatting, essential functions, organizing data, and making your sheet more powerful.
1. Entering and Editing Data
- Type text, numbers, or dates directly in cells.
- Use Enter to move down, Tab to move right.
- Autofill: Drag the blue corner to copy values or continue sequences like dates.
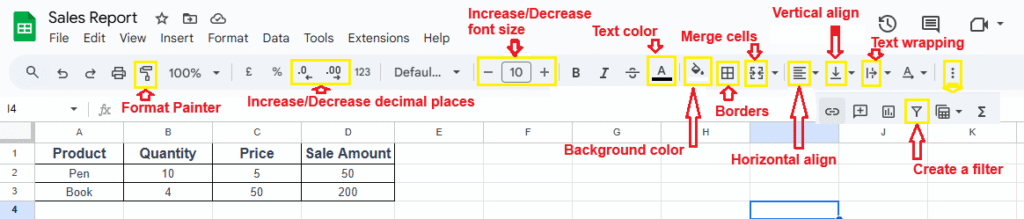
2. Basic Formatting Tools
- Font, Size & Style – Bold, italic, underline.
- Colors – Text and background highlight.
- Alignment – Left, right, center, top, middle.
- Merge Cells – Combine cells for titles or headers.
3. Working with Rows & Columns
- Insert / Delete rows and columns. (Right click on Row/Column → Delete row/column)
- Resize by dragging edges.
- Freeze rows/columns (View → Freeze) to keep headers visible.
4. Sorting and Filtering Data
- Sort – Organize alphabetically or numerically.
- Filter – Show only selected data (e.g., sales > 5000).

5. Essential Google Sheets Functions
Formulas always start with = in Google Sheets.
a) Math Functions
- =SUM(A1:A5) → Add numbers.
- =AVERAGE(A1:A5) → Find average.
- =MIN(A1:A5) → Smallest value.
- =MAX(A1:A5) → Largest value.
Also Read: Math and Trigonometry Functions in Excel
b) Logical Function
- =IF(A1>50,”Pass”,”Fail”) → Simple decision-making.
Also Read: IF Function in Excel (with AND & OR)
c) Text Functions
- =CONCAT(A1,” “,B1) → Join text.
- =LEN(A1) → Count characters.
- =LEFT(A1,5) → Extract first 5 characters.
Read More: Excel Functions to Handle Text
d) Date & Time Functions
- =TODAY() → Current date.
- =NOW() → Current date & time.
Read More: Excel Date & Time Functions
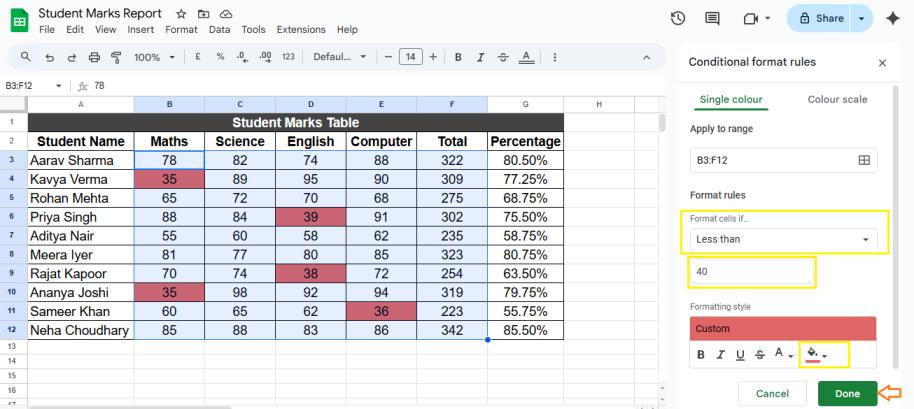
6. Conditional Formatting
Highlight cells automatically.
Example: Mark scores below 40 in red.
Steps:
- Select range.
- Go to Format → Conditional formatting.
- Set rule (e.g., Less than 40).
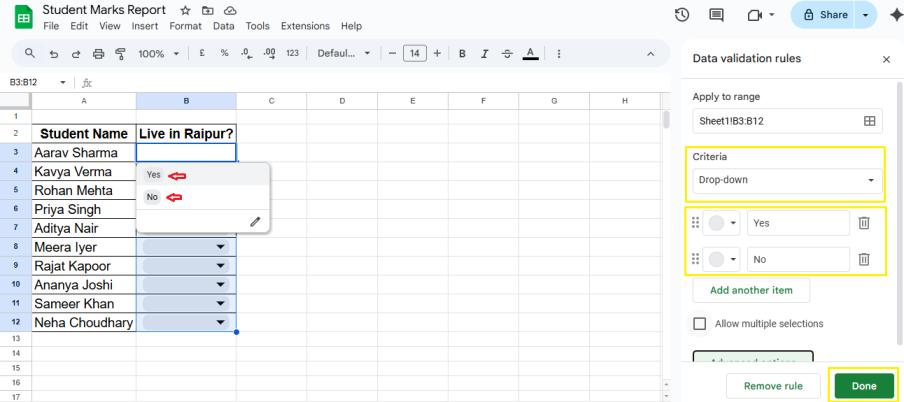
7. Data Validation (Dropdown Lists)
Restrict inputs with a dropdown.
Example: Limit entries to “Yes” or “No”.
- Data → Data validation → Add rule → List of items → Yes, No.
8. Creating Charts & Graphs
Turn numbers into visuals.
Steps:
- Select data.
- Insert → Chart.
- Choose bar, pie, line, etc.
Read More: Charts in Excel
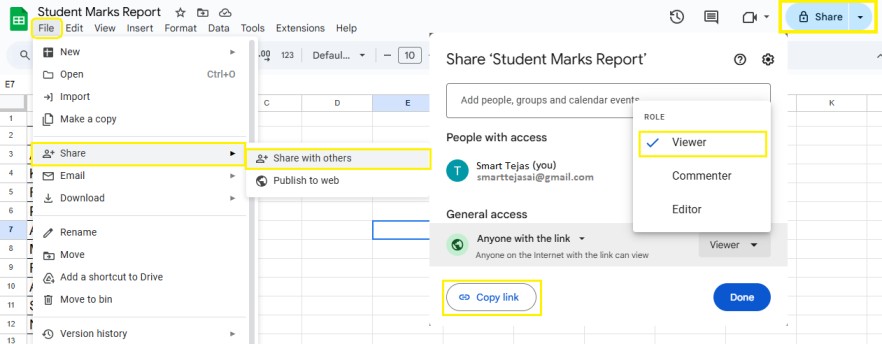
9. Collaboration Features
- File > Share > Share with others
- Share with team (Viewer, Commenter, Editor).
- Copy link
10. Keyboard Shortcuts
- Ctrl + C / Ctrl + V – Copy/Paste.
- Ctrl + Z – Undo.
- Ctrl + Shift + V – Paste values only.
- Ctrl + / – Show all shortcuts.
Read More: Keyboard Shortcuts Cheat Sheet
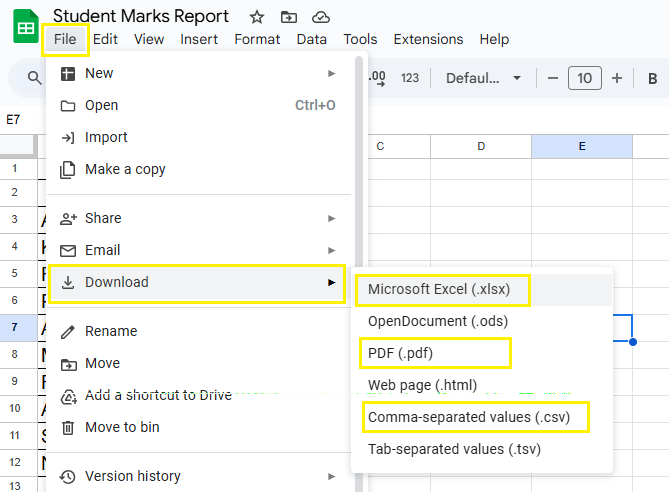
11. Exporting Google Sheets
- File → Download → Excel (.xlsx), PDF, or CSV.
Final Thoughts
With these basics, you’re now ready to perform daily tasks in Google Sheets like managing lists, performing calculations, and visualizing data. Whether it’s keeping track of expenses, maintaining attendance, creating to-do lists, or analyzing sales reports, these foundational skills give you the confidence to work efficiently.
One of the biggest advantages of Google Sheets is that you don’t need to be a tech expert to get started. Once you learn how to format cells, apply basic formulas, and create simple charts, you’ll realize how powerful and user-friendly it is compared to traditional spreadsheets. And since it works entirely online, you can access your files from anywhere, share them with teammates instantly, and even collaborate in real time.
Another benefit is how easily Google Sheets integrates with other Google Workspace apps like Google Forms, Docs, and Gmail, making it a perfect tool for both personal and professional tasks. For example, you could collect feedback using Google Forms and automatically analyze responses in Google Sheets without extra effort.
In the next tutorial, we’ll move towards advanced functions like VLOOKUP with IMPORTRANGE. This will open up a whole new level of possibilities—pulling data from different sheets or even different files and combining them into one. Once you master this, you’ll be able to manage large datasets like a pro.
What’s Next?
In the next post, we’ll learn about the IMPORTRANGE in Google Sheets