|
Getting your Trinity Audio player ready...
|
Learn how to use Cell Formatting in Excel with ease. This guide covers number formatting, bold text, wrap text, borders, and more to make your data clear and professional.
When you open Excel, you see a bunch of boxes called cells. Each cell can hold numbers, text, dates, and more. But just entering data isn’t enough — you also want it to look good and be easy to understand.
Let’s learn how to style, organize, and format your Excel data like a pro.
What is Cell Formatting?
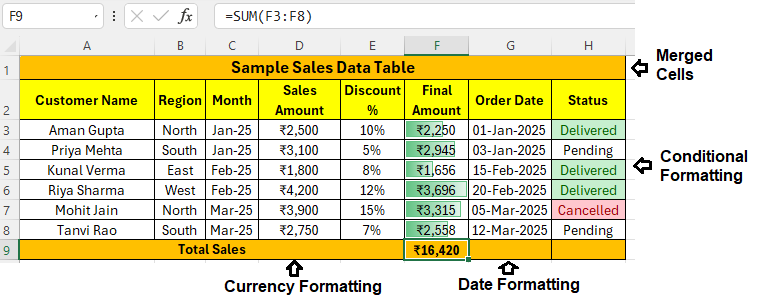
Cell formatting means changing how the data in a cell looks — without changing the actual value. You can format:
- Numbers (₹, %, decimals)
- Text (bold, colour, size)
- Cell appearance (background colour, borders)
- Alignment, wrapping, merging, and more
Think of it like giving your data a makeover — so it’s clear, readable, and professional.
Common Cell Formatting Options in Excel
Here are the most useful formatting features, explained simply:
1. Number Formatting
Choose how numbers should look:
- General: Default format (no specific styling)
- Number: With commas and decimals (e.g., 2,500.00)
- Currency: Adds ₹ symbol (e.g., ₹2,500)
- Percentage: Converts numbers to % (e.g., 0.25 → 25%)
- Date/Time: Shows data as a proper date or time
Example:
| Value Entered | Format | Displayed As |
|---|---|---|
| 2500 | Currency | ₹2,500.00 |
| 0.75 | Percentage | 75% |
| 01-06-2025 | Date | 01-Jun-25 |
To apply: Select cells → Home tab → Number group → Choose format from dropdown
2. Text Formatting
Make text stand out with:
- Bold, Italic, Underline
- Font size and style
- Font colour (for highlighting)
- Fill colour (background colour for the cell)
Example:
| Name | Style |
|---|---|
| Aman | Bold |
| Priya | Italic, Green |
| Kunal | Yellow background |
Select cells → Use Font group in Home tab
3. Cell Alignment
Control where your content appears in the cell:
- Left, Center, Right (horizontal)
- Top, Middle, Bottom (vertical)
- Wrap Text: Keeps long text inside the cell by showing it on multiple lines
- Merge Cells: Combine multiple cells into one large cell
Example:
| Merged Title |
|---|
| Sales Report – June 2025 |
Go to Home → Alignment group → Choose alignment, wrap, or merge
4. Borders and Gridlines
Add borders to organize and separate data:
- Outline the full table
- Use thick lines for totals
- Dotted/dashed lines for style
Example:
| Name | Sales |
|---|---|
| Aman | ₹2,000 |
| Priya | ₹3,500 |
Home tab → Font group → Border button
Bonus Formatting Tips
Use Format Painter
Copy formatting from one cell to another:
- Select a well-formatted cell
- Click Format Painter (paintbrush icon)
- Click the cell where you want to apply the same format
Use Cell Styles
Ready-made templates for heading, input, calculation, and more.
Home tab → Cell Styles
Conditional Formatting
Automatically change colour based on cell value (e.g., sales above ₹10,000 in green)
Home tab → Conditional Formatting
👉 Common Questions
Does formatting affect formulas?
No. Formatting changes how the cell looks, not the actual data or formulas.
Can I format multiple cells at once?
Yes! Select a range, then apply your formatting.
Can I undo the formatting?
Yes — press Ctrl + Z or use Clear Formats under Home → Editing → Clear.
Final Thoughts
Formatting isn’t just about beauty — it’s about clarity.
Good formatting helps you:
- Spot mistakes quickly
- Highlight important info
- Make reports easier to read
Once you master these simple tools, your Excel sheets will start to look smarter and more professional
What’s Next?
In the next post, we’ll learn about the Excel Keyboard Shortcuts