|
Getting your Trinity Audio player ready...
|
Learn how to use Data Validation in Excel to control data entry and avoid errors. From dropdowns to custom rules, this guide covers it all with examples.
Data Validation in Excel is a powerful feature that helps ensure the accuracy and consistency of data entered into your spreadsheets. By setting rules for what users can or cannot enter, you reduce the chance of mistakes and make your sheets more efficient.
In this post, you’ll learn:
- What is Data Validation
- How to create dropdown lists
- Custom rules using formulas
- Restrict numbers, dates, and text
- Real-life examples using a Sales table
- Tips, FAQs, and more
We’ll use the same Sales Table as reference:
| Bill Date | Bill No. | Customer Name | Location | Product | Qty | Sales Amount |
|---|---|---|---|---|---|---|
| 01/01/2024 | INV0030 | Yuvraj Nair | Korba | Suit | 6 | 13991 |
| 02/01/2024 | INV0033 | Yuvraj Nair | Rajnandgaon | T-Shirt | 9 | 64800 |
| 02/01/2024 | INV0081 | Yuvraj Nair | Gariaband | T-Shirt | 3 | 28467 |
| 03/01/2024 | INV0020 | Vivek Malhotra | Balod | Suit | 6 | 41580 |
| 04/01/2024 | INV0058 | Vivaan Sharma | Sarguja | Kurta | 4 | 46670 |
| … | … | … | … | … | … | … |
Basic Data Validation Types
1. Create a Dropdown List
Example: Allow only specific product names.
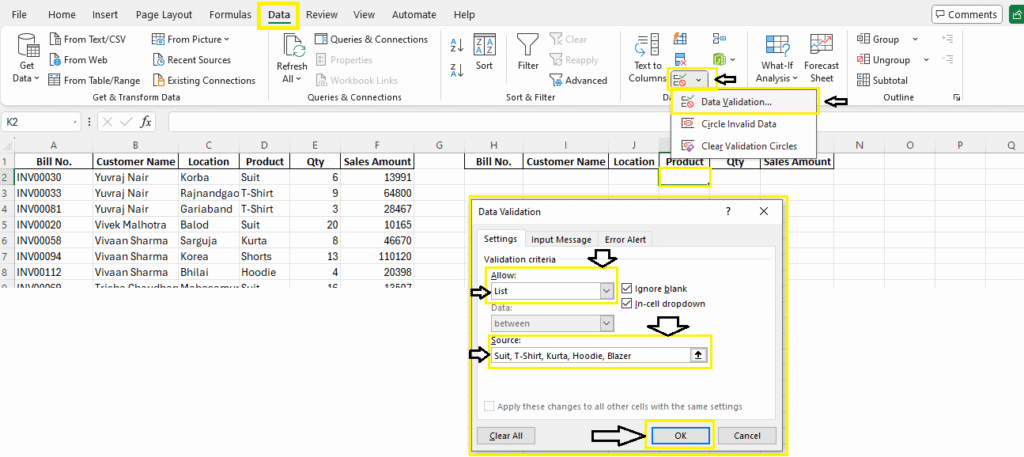
- Select cells in the “Product” column. (e.g. K2)
- Go to Data > Data Validation (Under the Data Tools section).
- In “Allow”, choose List.
- In “Source”, enter:
Suit, T-Shirt, Kurta, Hoodie, Blazer(Or select Range from Excel Sheet) - Select cell K2, then drag down to the last row of your data. After selecting, press Ctrl + D to apply (fill down) the Data Validation rule to all selected cells.
Read More: Conditional Formatting in Excel
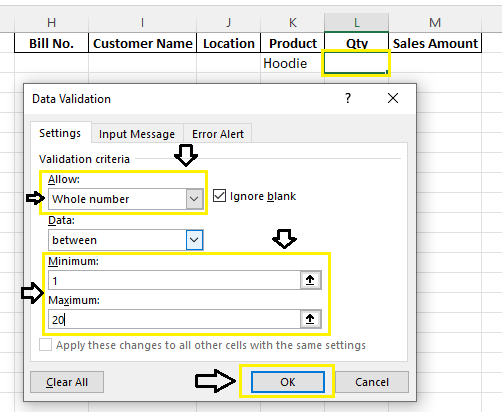
2. Restrict to Whole Numbers Only
Example: Allow Qty only between 1 and 20.
- Select “Qty” column (e.g. L2).
- Choose Allow: Whole Number > Between 1 and 20.
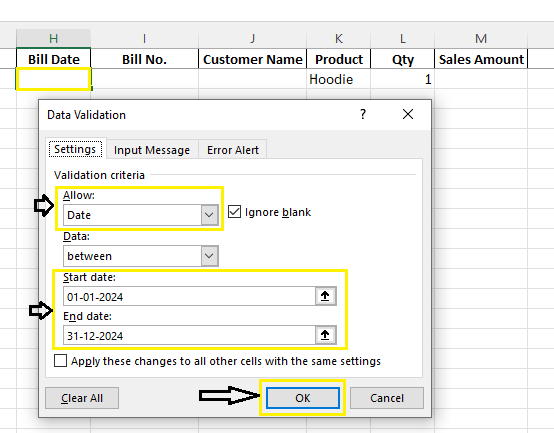
3. Limit Date Range
Example: Restrict to order dates within the current year. (Created New Column i.e. Bill Date)
- Allow: Date > Between > 0
1/01/2024and31/12/2024(Format: DD/MM/YYYY)
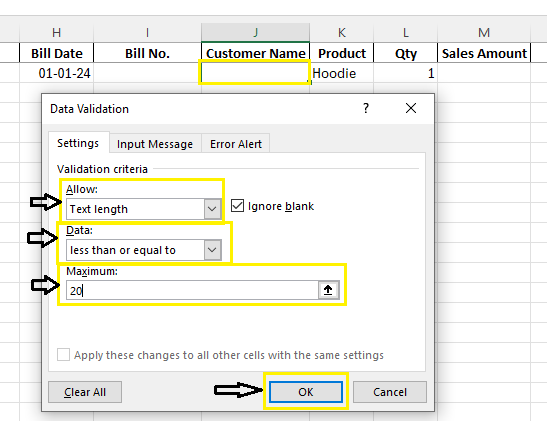
4. Text Length Restriction
Example: Limit customer names to 20 characters max.
- Allow: Text Length > less than or equal to > 20
Advanced Data Validation with Formula
5. Custom Formula – No Duplicate Bill Nos
Prevent users from entering a duplicate Bill No:
=COUNTIF($J$2:$J$113, J2)=1

6. Product Must Match Location
Example: Only allow “T-Shirt” if Location is “Gariaband”
=IF(M2=”T-Shirt”, L2=”Gariaband”, TRUE)
It means:
If the product is “T-Shirt”, then it must be from “Gariaband” — only then the entry will be allowed.
So:
- A customer from Gariaband can buy T-Shirt ✅
- A customer from other locations cannot buy T-Shirt ❌
- For all other products, any location is allowed ✅
7. Total Sales Must Be ≥ 5000
Apply in “Sales Amount” column:
=O2>=5000
Example 8: Restrict Product Entry Based on Customer’s Previous Purchases
Scenario:
You want to allow entry of “Blazer” for a customer only if they’ve already bought a Kurta before. This ensures upselling happens only after basic product sale.
How to Apply:
- Add a helper table that tracks past customer purchases (or use the main table).
- Use this formula in the Product column (e.g., cell M2):
=IF(M2="Blazer", COUNTIFS($K$2:$K$113, K2, $M$2:$M$113, "Kurta")>0, TRUE)
Explanation:
This checks whether the current customer (K2) has “Kurta” as a previous entry. If yes, they are allowed to enter “Blazer”. If not, validation fails.
Real-Life Use Cases
- Sales team dropdowns for consistent product names
- Prevent entering future dates in invoice systems
- Stop entry of too-long names/emails in customer forms
- Block duplicate invoice numbers
Error Alerts & Input Messages
Show Helpful Tips When User Clicks Cell
- In Data Validation, go to Input Message tab
- Add message like: “Choose a product from the list”
Show Warning or Stop Entry
- Under Error Alert tab:
- Style: Stop, Warning, or Information
- Customize message: “Qty must be between 1 and 20”
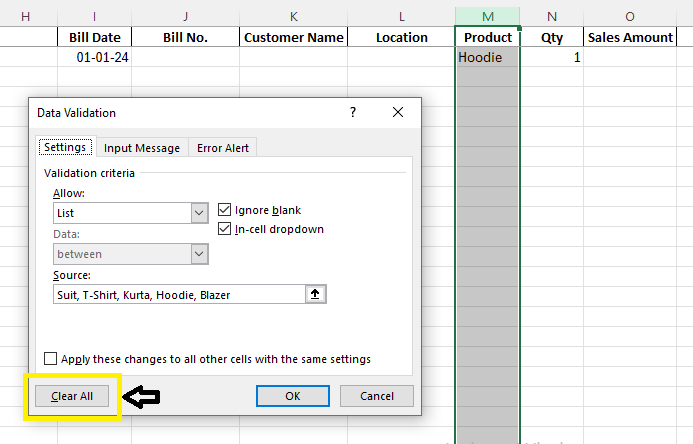
How to Remove Data Validation
- Select cells or a column (where data validation applied)
- Go to Data > Data Validation > Clear All
Download Practice Material
Summary
Data Validation helps control the kind of data that can be entered into Excel cells. Whether you’re preventing typos or ensuring business logic, this tool is a must-have for data quality.
FAQs – Data Validation in Excel
Can I apply multiple rules to the same cell?
Only one rule at a time, but formulas can be made complex to handle multiple conditions.
Can I use named ranges in Data Validation?
Yes! It’s recommended for dynamic dropdowns.
Does it work in Excel Online?
Basic features work, but formula-based validations may have limitations.
What’s Next?
In the next post, we’ll learn about the Freeze Panes in Excel